
To demonstrate how to display SharePoint document library in MS CRM 3.0 using IFRAME, go to http://www.microsoft.com/dynamics/crm/using/deploy/iframesharepoint.mspx
Either WSS or MOSS document library can be use to integrated with CRM 3.0.
Tuesday, February 26, 2008
How to Install Windows SharePoint Server
Window Server 2003 Standard Edition by default does not come with Windows SharePoint Server (WSS 3.0). It has to be installed separately if you want WSS. This are the steps required for installing WSS.
Then create a new top level site collection within Central Admin page for the new SharePoint virtual directory that you have just created in IIS.
Requirement for installing WSS 3.0
- MS SQL 2000 (with SP 3 or later) or 2005 has been installed.
- IIS, ASP.NET, Common Files services has been installed.
- *Frontpage extension server (if any) service is temporary shut down.
- Read http://technet2.microsoft.com/windowsserver/WSS/en/library/dcdb7f80-5d48-4b7c-9cb5-affa5f2936531033.mspx?mfr=true
How to install WSS 3.0
- Log on to the Windows 2003 server as an Administrator.
- Start the Add/Remove Windows Components Control Panel applet (Start, Settings, Control Panel, Add or Remove Programs, Add/Remove Windows Components).
- Select Application Server and click Details.
- Select ASP.NET (which automatically enables network COM+ access), select Internet Information Services (IIS), and click Details, as the figureshows.
- Ensure that Common Files, Internet Information Services Manager, and World Wide Web Service are selected. Click OK.
- Click Next to begin the installation, and click Finish after the components are installed. Download the Windows Sharepoint Services software from http://www.microsoft.com/windowsserver2003/technologies/sharepoint/default.mspx . At the time of this writing, the latest version (stsv2.exe ) includes Service Pack 2 (SP2). Execute the file to extract the SharePoint installation files.
To only extract the files and not start the installation, use the /t /c switches with the following command: C:\stsv2.exe /c /t:c:\wsssp2
SharePoint stores all its content in a Microsoft SQL database, which for Windows SharePoint Services can be Microsoft SQL Server Desktop Engine (MSDE) or, preferable, a full SQL Server 2005 or SQL Server 2000 installation (which uses Windows Integrated authentication mode). If you want to have SQL Server reside on a remote box, you need to initiate the installation of Windows SharePoint Services with the "remotesql=yes" switch. If SQL Server is installed locally, then this isn't required. To set up Windows SharePoint Services follow the steps below:
*Note: If the server farm has FrontPage server installed and running, :
- Install WSS setup file as normal
- Then go to IIS, and create a new SharePoint virtual directory under default website. Once a new virtual directory has been created, then read this article:
How to install WSS SP 1 - http://technet.microsoft.com/en-au/windowsserver/sharepoint/bb735839.aspx
Requirement for installing WSS SP 1
The following checklist below needs to be implemented initially as a prerequisite before installing WSS SP 1.
- WSS 3.0 has been installed.
- MS SQL 2000 (with SP 3 or later) or 2005 has been installed.
- Make sure that there is adequate hard drive space in your database files volumes, tempdb volumes, and Windows temporary folder on the servers running SQL Server, front-end Web servers, and application servers. The upgrade operation writes the progress of various steps into an upgrade log that can take up disk space, but if you plan for extra storage you should not encounter issues due to space limitations.
- Read http://technet2.microsoft.com/WindowsServer/WSS/en/library/91649a7e-6b5a-4e5a-9ee5-51951f4b857f1033.mspx
Saturday, February 23, 2008
Introduction to CRM
Microsoft CRM (Content Relationship Management) is a software tool that helps organinsation to build relationship, manage and maintain their existing and potential customers. The key objective purpose of CRM is to:
- Build customer value: Customer value means that the organization makes products and
services so satisfying, convenient, or valuable to the customer that the customer
would rather devote their time and money to the organization than to any
competitor. - Build potential leads: Assist ogranisation to learn about the potential customer
audiences so the organization can prepare to meet current and future needs. It is
also important to identify customer audiences whose needs cannot be profitably
met.
For more information about CRM, watch the webcast below about CRM version 3.0
Download this PDF book title "MS CRM 3 Small Business Edition".
Resources:
- http://www.microsoft.com/events/series/crm.aspx - CRM library webcasts
- http://www.microsoft.com/downloads/details.aspx?FamilyID=dd939ed9-87a5-4c13-b212-a922cc02b469&DisplayLang=en - Download CRM virtual machine setup disk
Renaming a MOSS server
These instructions below relates specifically to configure MOSS on a VM server that will share network LAN connection with other computers.
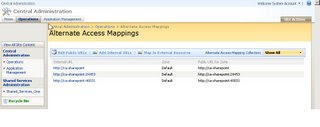
Figure 1
Figure 3
You will be asked to confirm the password. Enter it and click okay. Then click OK to exit the pool properties screen. Continue changing the remainder.
10. Drop and rebuild search index.
11. Browse to URL for Central Administration and test site.
1. Temporary disconnect the network plug from the server.
2. Log into the VM server as an administrator.
3. Change each alternate access mapping for your MOSS/WSS deployment in Central Administration:
- Open Central Administration, "Operations" Tab, "Alternate access mappings" link.
- Modify each mapping item to reflect your newly chosen server name. Don't modify the port number. Leave it alone. (see figure 1)

Figure 1
4. Run stsadm to rename the server
- Open a command prompt window
cd "C:\Program Files\Common Files\Microsoft Shared\web server extensions\12\BIN" - stsadm -o renameserver -newservername "newservername" -oldservername "oldservername"
5. Rename your Server via Change Name Operation in Windows Server 2003. Start Menu Control Panel System, "Computer Name" tab, "Change" button. Input your new server name. If the server was already setup with an existing domain name, the server won't allow you to do it because it requires network connection in order to communicate with the domain. Instead change domain to WORKGROUP first.
6. Shut down the server. Connect the server back to the network. Start the server and login in as administrator.
7. Change the WORKGROUP back the original domain name. Reboot the machine if server ask you to restart the computer.
8. Restart IIS. Go to command prompt. Type "iisreset /noforce"
9. Check all application pool identities in IIS (see figure 2) and update where the old machine name is still there. 
Figure 2
 Highlight the pool and view properties. Go to the identity tab. If the pool is using the “predefined identity” leave it set. Do not change it to configurable.You will definitely need to change Shared_Services_One, the two SharePoint and the SharePoint Central Administration. Be sure to review all the others to ensure they are correct (see figure 3). Simply edit the computer name portion of the user name, enter the password and click apply. Note the old server name in the picture was SHAREPNTSERVER.
Figure 3
You will be asked to confirm the password. Enter it and click okay. Then click OK to exit the pool properties screen. Continue changing the remainder.
10. Drop and rebuild search index.
11. Browse to URL for Central Administration and test site.
Resources
- http://moss-exchange.blogspot.com/2007/12/renaming-sharepoint-server.html
- http://www.sharepointblogs.com/mirjam/archive/2007/08/06/renaming-a-moss-server.aspx
Subscribe to:
Comments (Atom)
