
Are you looking to earn income from writing blog material?
If you're interested in writing for Mindsharp, you can email your resume to Bill English at bill@mindsharp.com.
They do compensate well for good material. This material will be placed on theirpremium content web site. If you need to earn a few extra hundred - or even thousands - dollars, this is a great way to do it. You learn new material, you write at home and you'll gain some exposure too.
Bill English is the author of the SharePoint Resource Kit and most recently the Microsoft Office SharePoint Server 2007 Administrator's Companion , owner and SharePoint trainer in MindSharp.
Sounds like a great opportunity!
Sunday, January 13, 2008
Monday, January 7, 2008
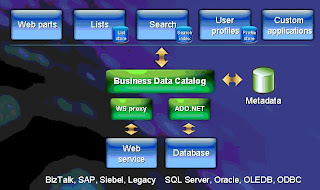
Tutorial Training: Part 7 - Implementing Business Data Catalog
The objective lessons to be learnt in this tutorial blog is to know how to implement a Business Data Catalog in MOSS.
A Business Data Catalog (BDC) is:
Other Resources
A Business Data Catalog (BDC) is:
- Metadata repository database that is located as a middle-layer software that seats between the back-end external applications such as SAP or an data source e.g. SQL (known as Line of Business (LOB) system) and the portal site (front end client applications).
- BDC has features to integrate LOB system to enable user to bring, report, extract and display key data from various LOB applications to Office SharePoint Server 2007 lists, Web Parts, search, user profiles, and custom applications, without having to write any lines of code (claim by Microsoft but alot of XML involved. Why?).
- In BDC, metadata describes entities: how to obtain instance information, relationships to other entities, and actions you can execute for an entity. The content of a metedata is in XML in a specific required format.
- Anything that can be accessed by ADO.NET data provider or web service is BDC.

To practically begin using BDC, follow this step:
- Download a free * Microsoft Business Data Catalog Editor.
- Install the MS BDC editor onto the server farm that is running MOSS and/or on your development desktop PC.
- Open MS BDC editor, connect to the existing LOB system data source and begin creating/editing the XML file to extract and display the specific data record.
- Once the metadata XML file has been created, we need to import it to MOSS. How? Go to Central Administrator webpage. Then navigate to ShareServiceProvider -> Import Business Data Catalog Applications.
- Browse and select the XML file.
- Click the import button.
- Edit the web page in MOSS that you want to display the BDC.
- Select Business Data Catalog List web part.
- Select the metadata name that was imported in step 4.
- Click apply and it's finish.
*Note: There are other BDC editors availiable that you can use instead of using MS BDC editor like BDC Meta Man which you can download as a evaluation trail version for so many days that ahs some features has been disabled and require you have to pay for it after expiration in order to use the full version. One advantage of using MS BDC that I like is that it has an execution feature that allows user to test their scripts against the database before deploying the XML metadata to MOSS, while BDC Meta Man (currently at the time of writing this blog) doesn't have this feature.
For more information about BDC, watch this webcast:Other Resources
- BDC glossary term for definitions.
- MSDN BDC
- Watch Dnr TV webcast on BDC
Tutorial Training: Part 6 - Implementing Web Parts
What is a web part?
Web Parts are components that enable users to gather information they care about and customize the appearance of Web pages in MOSS environment. For example, visit Pageflakes website, where one Web Part might display a user's appointment calendar; another might create a graph showing current sales figures; and a third might show a list of new business topics, each of which functions as a link to a video or audio presentation. Developers can also create custom Web Part components and make them available to SharePoint users, for building customizable pages that meet their needs.
Watch this webcast to see web part in demo with MOSS using VS 2005:
Resources
- Introduction to ASP.NET 2 WebPart Framework
- Web Parts Control Set Overview
- Example - creating a web part with deployment http://www.developer.com/net/asp/article.php/10917_3620316_1
- Lynn Langit blog
Implementing Masterpage in MOSS
Overview
Page Layouts and Master Pages (MSDN) - overview of master pages and page layouts.
Master pages and page layouts dictate the overall look and feel of your SharePoint site. Master pages contain controls that are shared across multiple page layouts, such as navigation, search, or language-preference for multilingual sites. Page layouts contain field controls and Web Parts. The following figure shows how page layouts and master pages work together to create the layout for a Web page.

Master Page
1. Open the Site from SharePoint Designer
2. Navigate to the Master Page
3. Edit and Save As

Note: Resetting a customized page to the site definition restores the page to its original condition. However, if you are working with pages that reside in a document library, you have an alternative. For example, master pages reside in the Master Page Gallery, which is a document library, and you can use versioning for files in document libraries. If you have the versioning feature turned on for the Master Page Gallery when you modify a master page, you can subsequently roll back to a previous version instead of starting over by resetting to the site definition.
Home > Master Page Gallery > BlackBand > Approve/Reject
Master Page Gallery: BlackBand
Approved. This item will become visible to all users.
Rejected. This item will be returned to its creator and not appear in public views.
Pending. This item will remain visible to its creator and all users with the Manage Lists permission.
Page Layout
In SharePoint Designer, select File -> New -> SharePoint Content tab

A theme is just a CSS file and images, the layout of the page such as the location of the navigation, can't be altered.
A benefit to themes is that when you apply a theme, it also affects the pages in the _layouts directory, whereas master pages do not.
In some situations, both master pages and themes can be used. If you use a master page to style the site, using a custom theme can style the _layouts pages to coordinate with the look of the site. If you need to apply different color palettes for one design for sub sites, in MOSS use can use the alternate CSS setting, but that isn't available for WSS sites. You can create a custom master page for the WSS sites to use, then create and apply different themes to change the color palette of sub sites.
One drawback to a theme is that you have to apply it at the site level for each site. You can apply a theme (pick one that most closely resembles what you want to ultimately do with your site design) to your site, and then a copy of the theme CSS file will be created for the site. You can edit this file in SharePoint Designer (thus creating a copy of it in the content database and customizing the file) and create your customizations for your site. Custom CSS
Changing BlueBand to another theme Master Pages
Links
Page Layouts and Master Pages (MSDN) - overview of master pages and page layouts.
Master pages and page layouts dictate the overall look and feel of your SharePoint site. Master pages contain controls that are shared across multiple page layouts, such as navigation, search, or language-preference for multilingual sites. Page layouts contain field controls and Web Parts. The following figure shows how page layouts and master pages work together to create the layout for a Web page.

Master Page
1. Open the Site from SharePoint Designer
2. Navigate to the Master Page
3. Edit and Save As

Note: Resetting a customized page to the site definition restores the page to its original condition. However, if you are working with pages that reside in a document library, you have an alternative. For example, master pages reside in the Master Page Gallery, which is a document library, and you can use versioning for files in document libraries. If you have the versioning feature turned on for the Master Page Gallery when you modify a master page, you can subsequently roll back to a previous version instead of starting over by resetting to the site definition.


Home > Master Page Gallery > BlackBand > Approve/Reject
Master Page Gallery: BlackBand
Approved. This item will become visible to all users.
Rejected. This item will be returned to its creator and not appear in public views.
Pending. This item will remain visible to its creator and all users with the Manage Lists permission.
Page Layout
In SharePoint Designer, select File -> New -> SharePoint Content tab

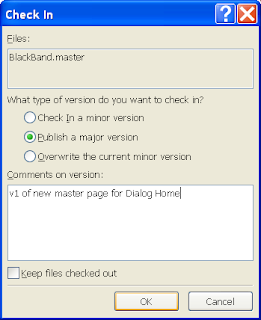
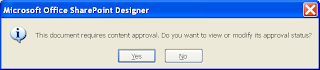
Add a table and add a Page Content field in the second row. Save, check in as major version, and approve. Home > Site Settings Master pages and page layouts Approve dialogwelcome.aspx
Modify default.master and to work with a themeA theme is just a CSS file and images, the layout of the page such as the location of the navigation, can't be altered.
A benefit to themes is that when you apply a theme, it also affects the pages in the _layouts directory, whereas master pages do not.
In some situations, both master pages and themes can be used. If you use a master page to style the site, using a custom theme can style the _layouts pages to coordinate with the look of the site. If you need to apply different color palettes for one design for sub sites, in MOSS use can use the alternate CSS setting, but that isn't available for WSS sites. You can create a custom master page for the WSS sites to use, then create and apply different themes to change the color palette of sub sites.
One drawback to a theme is that you have to apply it at the site level for each site. You can apply a theme (pick one that most closely resembles what you want to ultimately do with your site design) to your site, and then a copy of the theme CSS file will be created for the site. You can edit this file in SharePoint Designer (thus creating a copy of it in the content database and customizing the file) and create your customizations for your site. Custom CSS
Changing BlueBand to another theme Master Pages
Links
- http://sharingpoint.blogspot.com/2006/06/extreme-sharepoint-design-_115108192207171602.html
- http://www.heathersolomon.com/blog/archive/2007/05/13/Master-Pages-vs.-Themes-Which-Do-You-Choose.aspx
- http://www.heathersolomon.com/resume/salesintra.aspx
Tutorial Training: Part 4 - Implementing Content Management Solutions
The objective lessons that will be covered in this tutorial blog will be:
- Managing & Implementing Documents and Content with MOSS 2007
Web cast
Download the powerpoint slides
Sunday, January 6, 2008
Training Tutorial: Part 3 - Implementing Portal Solutions
This blog tutorial focuses on the portal-oriented features provided by Microsoft Office SharePoint Server 2007, by describing portal sites, collaborative features, and user profiles and audiences.
At the end of reading this blog, you would have learnt:
At the end of reading this blog, you would have learnt:
- Implementing Collaborative Features
Download Presentation slides
Web Cast
Friday, January 4, 2008
Training Tutorial: Part 2 - Planing and installing MOSS
The objective lessons that will be covered in this tutorial blog are:
- Planning and installing MOSS Server 2007 (Download and read part 1 and part 2 presentation. Alternatively you can download the full installed tutorial)
- Configuring MOSS Server 2007
- Disaster Recovering For MOSS
There are also some video webcasts accompanying the Planning & installing MOSS presentation slides as follows:
1.1 Planning & installing MOSS Server 2007 part 1 presentation: Slide # 7 - Deploying Windows SharePoint Services
1.2 Planning & installing MOSS Server 2007 part 1 presentation: Slide # 14 - Installing SharePoint
1.3 Planning & installing MOSS Server 2007 part 1 presentation: Slide # 18 - Finishing SharePoint installation
1.4 Planning & installing MOSS Server 2007 part 1 presentation: Slide # 29 - Exploring Windows SharePoint
1.5 Planning & installing MOSS Server 2007 part 2 presentation: Slide # 12 - Configuring WSS for the extranet
1.6 Planning & installing MOSS Server 2007 part 2 presentation: Slide # 14 - Create content deployment path
1.7 Planning & installing MOSS Server 2007 part 2 presentation: Slide # 19 - Managing Timer Jobs & Service Accounts
1.8 Planning & installing MOSS Server 2007 part 2 presentation: Slide # 22 - Preparing for disater recovery
3. Disaster Recovery Strategies for MOSS 2007 - web cast
2. Configuring MOSS
2. 1 Web cast (Part 1 out of 2)
2.2 Web cast (Part 2 out of 2)
2.3 Managing and administering MOSS
2.3.1 PowerPoint - Download
2.3.2 Web cast
2.4 Configuring Search in MOSS
2.4.1 PowerPoint Presentation - Download
2.4.2 Web cast
Download MOSS Deployment guide document
Training Tutorial: Part 1 - Overview of Microsoft Office SharePoint Server 2007
This introductory blog provides an overview of Microsoft Office SharePoint Server 2007 (MOSS 2007). The objective lessons that will be covered are:
Share Point is a MS product that has many out of the box tools aimed at empowering collaboration within an organization between members and their partners and customers, to empower and increase productivity to end-users. In this context, a portal is just one of the possible practical applications of the term “collaboration”.
- Getting started with MS SharePoint technologies (Slides)
- The benefit of using MS SharePoint (Slides & Web cast)
Share Point is a MS product that has many out of the box tools aimed at empowering collaboration within an organization between members and their partners and customers, to empower and increase productivity to end-users. In this context, a portal is just one of the possible practical applications of the term “collaboration”.
Webcast - Getting started with MOSS
Download this webcast
- For further reading on learning the overview of MOSS, you can download a PDF e-book here.
- Also read Four Essentials for Building Your SharePoint Strategy (from this link)
- To compare the difference between WSS and MOSS, click here.
Wednesday, January 2, 2008
Active Directory & SharePoint 2007
Active Directory on a Windows Server 2003 Network
Active Directory is the information hub of the Windows Server 2003 operating system. The following figure shows Active Directory as the focal point of the Windows Server 2003 network used to manage identities and broker relationships between distributed resources so they can work together.
Active Directory on a Windows Server 2003 Network

Active Directory provides:
Watch this webcast below on the introduction to AD
Active Directory is the information hub of the Windows Server 2003 operating system. The following figure shows Active Directory as the focal point of the Windows Server 2003 network used to manage identities and broker relationships between distributed resources so they can work together.
Active Directory on a Windows Server 2003 Network

Active Directory provides:
- A central location for network administration and delegation of administrative authority. You have access to objects representing all network users, devices, and resources and the ability to group objects for ease of management and application of security and Group Policy.
- Information security and single sign-on for user access to network resources. Tight integration with security eliminates costly tracking of accounts for authentication and authorization between systems. A single user name and password combination can identify each network user, and this identity follows the user throughout the network.
- Scalability. Active Directory includes one or more domains, each with one or more domain controllers, enabling you to scale the directory to meet any network requirements.
- Flexible and global searching. Users and administrators can use desktop tools to search Active Directory. By default, searches are directed to the global catalog, which provides forest-wide search capabilities.
- Storage for application data. Active Directory provides a central location to store data that is shared between applications and with applications that need to distribute their data across entire Windows networks.
- Systematic synchronization of directory updates. Updates are distributed throughout the network through secure and cost-efficient replication between domain controllers.
- Remote administration. You can connect to any domain controller remotely from any Windows-based computer that has administrative tools installed.
- Single, modifiable, and extensible schema. The schema is a set of objects and rules that provide the structure requirements for Active Directory objects. You can modify the schema to implement new types of objects or object properties.
- Integration of object names with Domain Name System (DNS), the Internet-standard computer location system. Active Directory uses DNS to implement an IP-based naming system so that Active Directory services and domain controllers are locatable over standard IP both on intranets and the Internet.
- Lightweight Directory Access Protocol (LDAP) support. LDAP is the industry standard directory access protocol, making Active Directory widely accessible to management and query applications. Active Directory supports LDAPv3 and LDAPv2.
Active Directory Setup
Go to: http://www.petri.co.il/how_to_install_active_directory_on_windows_2003.htm
Watch this webcast below on the introduction to AD
RSS Viewer web part and authenticated feeds
teRSS Viewer web part authentication requirements
In B2, configuring the RSS Viewer web part to display an RSS feed from a MOSS site nearly always worked without difficulty. In B2TR, you may encounter a stubborn error “The RSS webpart does not support authenticated feeds” when trying to display an RSS feed from a MOSS site. The authentication behavior has changed, to match the original design that was not implemented properly in B2. RSS Viewer will now only work with Authenticated feeds (default for MOSS) when the MOSS server is setup with Kerberos authentication. Technical details: In B2, the machine account was used to access the feed; since this account is part of “All Authenticated Users” most feeds just worked. However, use of the machine account was considered to pose a security vulnerability. In B2TR, this was fixed to connect to feeds as anonymous, then delegation support was explicitly added by having ASP.Net negotiate the authentication mechanism.
Changing to Kerberos authentication
1. On the Central Administration page, click Application Management.
2. Under the Application Security section, click Authentication Providers.
3. Click the Default provider, and change Integrated Widows authentication to Negotiate (Kerberos)
If SharePoint and the databases it uses are hosted on the same server, this is the only change required to enable RSS Viewer functionality to RSS feeds hosted by SharePoint.
If the SharePoint databases are hosted by a different server than is hosting SharePoint, further configuration is required to enable Kerberos delegation. This is the recommended scenario for farm deployments. To enable Kerberos delegation for a SharePoint web application, the account used for its application pool identity must be configured as “trusted for delegation” and have an SPN registered (see below). If using Network Services for the AppPool identity, then this applies to the machine account. Otherwise, it applies to the domain account configured for the AppPool identity. The machine account of the database server must also have an SPN registered, although it is not necessary for it to be trusted for delegation. The end-user accounts require neither an SPN nor “trusted for delegation.”
In an AD environment whose Domain Functional Level is set to Windows Server 2003, this level of trust can be focused using Constrained Delegation. This ensures that the delegation trust is only permitted between the SharePoint WFE servers and the correct database server.
SPN
The MSDN article Security Briefs: Credentials and Delegation discusses several topics regarding SPNs and Kerberos delegation that are appropriate for this scenario, including use of the SETSPN and KERBTRAY tools, the "trusted for delegation" attribute, and how to configure Kerberos constrained delegation.
How to add PDF including iFilter
The procedure to add PDF iFilter in MOSS are as follows:
- Download Adobe Acrobat PDF IFilter from http://www.adobe.com/support/downloads/thankyou.jsp?ftpID=2611&fileID=2457
- Install the IFilter on the server farm that has MOSS installed.
- Open IE and click on “Images” link
- Type ICPDF.gif in the search field and click the search button
- In the search result, located 16x16 PDF icon image and click it
- Then click the link titled “See Image Alone”
When the image appears alone in the browser, righ-click the image and select save picture as from the content menu - Save the image to C:\Program Files\Common Files\Microsoft Shared\Web Server Extension\12\TEMPLATE\Images
- Open C:\Program Files\Common Files\Microsoft Shared\Web server extension\12\Template\XML\DOCICON.XML with text editor
- Locate "ByExtension
" element and add the following tag below: "Mapping Key=”pdf” Value=”icpdf.gif " - Save and close DOCICON.XML
- Go to: Shared Services Administration: SharedServicesProvider01 > Search Settings > File Types (see pic below)
- Then click the “New File Types” link
- Type pdf into the file extension filed and click OK button
- Close IE
- Restart IIS
Tuesday, January 1, 2008
FREE SharePoint Hosting Space
If you are looking to get a FREE hosting site for SharePoint, I've found this link.
- No time limit
- 5 MB Free space
- Up to 5 users
- No credit card
Give people access to MOSS site
When giving a person/people access to your MOSS site, the steps are as follows:
- Go to Central MOSS administration website and logged in as an adminsitrator
- Navigate to SharedServicesProvider01 > User Profile and Properties > View User Profiles > Add User Profile
- Enter the person's account details and save it when all the person's relevant details has been entered.
- Go to Your MOSS site that you want the person to have access to.
- Navigate to Site Action->Site Settings->People and groups
- Select the group you wan the person to be added
- Go to the tab menu New->Add users
- Add the user who will have access permission for that group
How to use AJAX in SharePoint
The following steps on how to use AJAX in MicroSoft Office SharePoint Server (MOSS) 2007 are as follows:
- Since MOSS was originally designed with .NET 2 framework technology, then firstly you need to download ASP.NET 2.0 AJAX Extensions v1.0 here
- Install AJAX Extension v1 to the server farm that runs MOSS.
- Configure the web.config file on the server farm. Click here for instructions.
- Download SmartPart from codeplex and install SmartPart on the server farm. (check this screencast on how to install SmartPart on the server farm).
Now you can start building ASP.NET AJAX style user controls in Visual Studio 2005 and use them in SharePoint as *webparts
For more resources, click here
*Note: Web Parts are components that enable users to gather information they care about and customize the appearance of Web pages in MOSS environment. For example, visit Pageflakes website, where one Web Part might display a user's appointment calendar; another might create a graph showing current sales figures; and a third might show a list of new business topics, each of which functions as a link to a video or audio presentation. Developers can also create custom Web Part components and make them available to SharePoint users, for building customizable pages that meet their needs.
SmartPart on the other hand is a web part in MOSS that can host ASP.NET web user controls (ascx) and support AJAX extensions. SmarPart was an idea that since evolved by the SharePoint community to allo Developers to ceate .NET user controls and use them in MOSS developement by using familar design available in Visual Studio by dragging, dropping and clicking controls, instead of the whole approach of coding the UI object at run time and taking care of event handling and HTML rendering. Hence SmartPart increased development productivity.
Training Tutorial: Part 5 - Implementing Business Forms
The objective in this tutorial blog is to learn the following:
Using InfoPath
When creating a simple workflows that comes out of the MOSS box, using InfoPath application to create it is sufficient. Click this link to download and watch how to use InfoPath or watch the webcast below.
Adam Buenz of SharePointSecuity.com has published a set of comprehensive Mastering InfoPath Development Series.
Creating workflow with Visual Studio
Go to Shelton's Blog (Microsoft Evangelist) to get started on using workflow with VS 2008 for deployment to MOSS 2007.
Alternatively, I recommand watching this Microsoft Webcast presented by Shelton himself as well at: http://msevents.microsoft.com/CUI/WebCastEventDetails.aspx?EventID=1032359912&EventCategory=5&culture=en-AU&CountryCode=AU
To learn how to create workflows using VS 2005, click here.
- Know how to use InfoPath to create business forms.
- Know how to create workflows using Visual Studio 2005 and/or 2008
Using InfoPath
When creating a simple workflows that comes out of the MOSS box, using InfoPath application to create it is sufficient. Click this link to download and watch how to use InfoPath or watch the webcast below.
Adam Buenz of SharePointSecuity.com has published a set of comprehensive Mastering InfoPath Development Series.
Creating workflow with Visual Studio
Go to Shelton's Blog (Microsoft Evangelist) to get started on using workflow with VS 2008 for deployment to MOSS 2007.
Alternatively, I recommand watching this Microsoft Webcast presented by Shelton himself as well at: http://msevents.microsoft.com/CUI/WebCastEventDetails.aspx?EventID=1032359912&EventCategory=5&culture=en-AU&CountryCode=AU
To learn how to create workflows using VS 2005, click here.
*** Where Do You Start To Learn MOSS For Beginners?
When I started off learning MOSS 2007, I didn't know where to begin as this is a hugh topic to cover. So I recommend downloading MS MOSS Training onto your desktop to get started and watch the webcast tutorials. This tutorial is useful for beginner to intermediate audience.
Then to become a more techncial user/Developer like myself (with programming background and keen to look under the hood) using Visual Studio 2005 with MOSS 2007, I had to firstly download and install the following VS 2005 extension software tools to be added:
- Visual Studio 2005 Extensions for Windows SharePoint Services (WSS)
- Visual Studio 2005 Extensions for Windows Workflow Foundation
- Visual Studio 2005 Extensions for .NET Framework 3 (WCF & WPF)
- Office SharePoint Server 2007 SDK & ECM Starter Kit
The system requirements for all the extensions to be successfully installed on VS 2005 is that the PC which you will be using for development has to at least have the following softawre below. Otherwise there will be some digging around (for me the hard way) if you don't have them:
- Windows Server 2003 OS
- SharePoint Server 2007
If you are a Developer, you can also use VS 2008 with MOSS instead of using VS 2005 and the beauty with using VS 2008 is that you DON"T need to install other external add-on applications because VS 2008 already has Office SharePoint add-ons and many more components out of the box.
Subscribe to:
Posts (Atom)
